EQ, Part I
In the previous song project post, I mentioned that the tracks had some EQ on them. There are a number of different reasons for using EQ:
- on individual instrument tracks to bring out particular characteristics of that instrument
- on individual instrument tracks to make multiple instruments sit better together
- on the overall mix to reduce listener fatigue
- on the overall mix to make up for deficiencies in the listening environment
The third is normally done at mastering stage and the fourth by both mastering engineers (preempting deficient listening environments) and the listeners themselves. I'm not going to talk about either of them here.
Here is a graph showing the frequencies coming from the particular piano sound I'm using when I play an A.
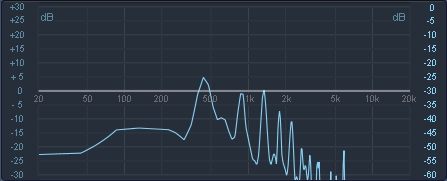
Note that the main peak is that the fundamental frequency of 440Hz. There are also bumps at multiples of 440: 880Hz, 1320Hz, 1760Hz and so on. It is the amplitude of those overtones and how they change over time that really makes the note sound like a piano and not something else. Notice that there are also other little bumps—lots is going on: from other strings resonating to the actual sound of the hammer hitting the string (as opposed to just the string vibration itself).
But typically you aren't just playing a single note. Here is the same graph for the right hand piano riff from the song:
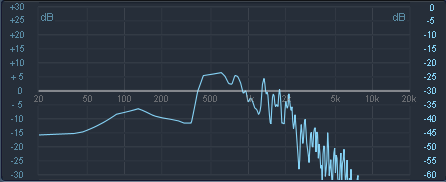
The important thing here is just the range in which the frequencies occurs.
And here is the full piano riff, both left and right hands:
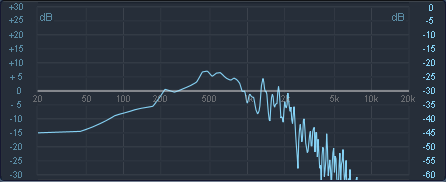
Because the piano parts are fairly high, you see there isn't much happening below 220Hz (which is A2, the lowest note the piano plays in the song).
If you compare that to the bass guitar riff:
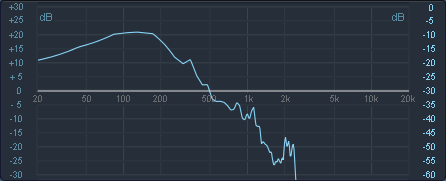
you'll notice most of the action is happening between 55Hz and 220Hz. But notice that there are other bumps as well. Boosting in that range will change how much those other sounds with come through.
I'm still a novice at mix engineering but one thing I've definitely learnt is that you want to treat different drums separately during EQ. In particular you want to EQ your kick and snare separately.
Of course, drums aren't playing a pitch but they have a very complex set of frequencies and lots going on at different parts of the spectrum.
Here's the raw analysis of the kick drum:
Notice most of it is sub-100Hz but there is significant stuff going on above 1000Hz (other vibrations beside the skin, the initial hit sounds as opposed to the sound that reverberates in the chamber)
Here's the snare for comparison:
You can see the main frequency is around 200Hz but there are other bumps caused by things like the actually sound of the stick hitting the skin. In a subsequent post, I'll include sound samples so you can here the effect of boosting different frequencies.
In additional to controlling the sound of the individual instruments, there is also the relationship between the instruments as I mentioned at the start. In this particular song, the piano doesn't go low enough to really muddy the bass, but if it did, I might want to attenuate the low frequencies of the piano. Making sure the snare comes through is important, so I could boost it around 200-300Hz or narrowly scoop out that frequency from other instruments.
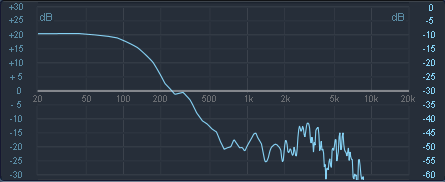
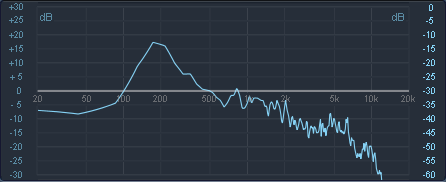
In the recordings you've heard so far, the piano does have a drop off below 200Hz (even though it doesn't really need it); the snare is boosted at 200Hz and 800Hz; the kick drum is boosted at 60Hz, 1500Hz and 3500Hz but attenuated at 200Hz; and the bass guitar is boosted at 80Hz. These are by no means final numbers; more of a default to use as a starting point.
And there's a whole other dimension to all this one vocals are added :-)
The original post was in the categories: record_producing_and_engineering song_project but I'm still in the process of migrating categories over.